Vue3 过10种组件通讯方式 - 掘金 (juejin.cn)
- Props
- emits
- expose / ref
- Non-Props
- v-model
- 插槽 slot
- provide / inject
- 总线 bus
- getCurrentInstance
- Vuex
- Pinia
- mitt.js
Props
父组件传值给子组件(简称:父传子). Props | Vue.js (vuejs.org)
父组件
// Parent.vue
<template>
  <!-- 使用子组件 -->
  <Child :msg="message" />
</template>

<script setup>
import Child from './components/Child.vue' // 引入子组件

let message = '雷猴'
</script>
子组件
// Child.vue

<template>
  <div>
    {{ msg }}
  </div>
</template>

<script setup>

const props = defineProps({
  msg: {
    type: String,
    default: ''
  }
})

console.log(props.msg) // 在 js 里需要使用 props.xxx 的方式使用。在 html 中使用不需要 props

</script>
在 <script setup> 中必须使用 defineProps API 来声明 props,它具备完整的推断并且在 <script setup> 中是直接可用的。
在 <script setup> 中,defineProps 不需要另外引入。
emits
父组件
// Parent.vue

<template>
  <div>父组件:{{ message }}</div>
  <!-- 自定义 changeMsg 事件 -->
  <Child @changeMsg="changeMessage" />
</template>

<script setup>
import { ref } from 'vue'
import Child from './components/Child.vue'

let message = ref('雷猴')

// 更改 message 的值,data是从子组件传过来的
function changeMessage(data) {
  message.value = data
}
</script>
子组件
// Child.vue

<template>
  <div>
    子组件:<button @click="handleClick">子组件的按钮</button>
  </div>
</template>

<script setup>

// 注册一个自定义事件名,向上传递时告诉父组件要触发的事件。
const emit = defineEmits(['changeMsg'])

function handleClick() {
  // 参数1:事件名
  // 参数2:传给父组件的值
  emit('changeMsg', '鲨鱼辣椒')
}

</script>
和 props 一样,在 <script setup> 中必须使用 defineEmits API 来声明 emits,它具备完整的推断并且在 <script setup> 中是直接可用的。更多细节请看 文档。
expose / ref
子组件可以通过 expose 暴露自身的方法和数据。父组件通过 ref 获取到子组件并调用其方法或访问数据。
状态选项 | Vue.js (vuejs.org)
父组件
// Parent.vue

<template>
  <div>父组件:拿到子组件的message数据:{{ msg }}</div>
  <button @click="callChildFn">调用子组件的方法</button>

  <hr>

  <Child ref="com" />
</template>

<script setup>
import { ref, onMounted } from 'vue'
import Child from './components/Child.vue'

const com = ref(null) // 通过 模板ref 绑定子组件

const msg = ref('')

onMounted(() => {
  // 在加载完成后,将子组件的 message 赋值给 msg
  msg.value = com.value.message
})

function callChildFn() {
  // 调用子组件的 changeMessage 方法
  com.value.changeMessage('蒜头王八')

  // 重新将 子组件的message 赋值给 msg
  msg.value = com.value.message
}
</script>
子组件
// Child.vue

<template>
  <div>子组件:{{ message }}</div>
</template>

<script setup>
import { ref } from 'vue'

const message = ref('蟑螂恶霸')

function changeMessage(data) {
  message.value = data
}

使用 defineExpose 向外暴露指定的数据和方法
defineExpose({
  message,
  changeMessage
})

</script>
在 <script setup> 中,defineExpose 不需要另外引入。
Non-Props
所谓的 Non-Props 就是 非 Prop 的 Attribute。
意思是在子组件中,没使用 prop 或 emits 定义的 attribute,可以通过 $attrs 来访问。
常见的有 class 、style 和 id。
父组件
// Parent.vue

<template>
  <Child msg="雷猴 世界!" name="鲨鱼辣椒" />
</template>

<script setup>
import { ref } from 'vue'
import Child from './components/Child.vue'
</script>
子组件
// Child.vue

<template>
  <div>子组件:打开控制台看看</div>
</template>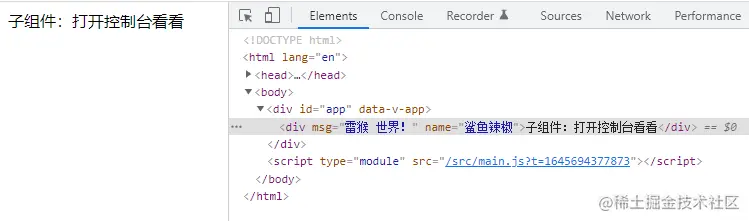
v-model
v-model 是 Vue 的一个语法糖。在 Vue3 中的玩法就更多(晕)了。
父组件
// Parent.vue

<template>
  <Child v-model="message" />
</template>

<script setup>
import { ref } from 'vue'
import Child from './components/Child.vue'

const message = ref('雷猴')
</script>
子组件
// Child.vue

<template>
  <div @click="handleClick">{{modelValue}}</div>
</template>

<script setup>
import { ref } from 'vue'

// 接收
const props = defineProps([
  'modelValue' // 接收父组件使用 v-model 传进来的值,必须用 modelValue 这个名字来接收
])

const emit = defineEmits(['update:modelValue']) // 必须用 update:modelValue 这个名字来通知父组件修改值

function handleClick() {
  // 参数1:通知父组件修改值的方法名
  // 参数2:要修改的值
  emit('update:modelValue', '喷射河马')
}

</script>
或者这样
// Child.vue

<template>
  <div @click="$emit('update:modelValue', '喷射河马')">{{modelValue}}</div>
</template>

<script setup>
import { ref } from 'vue'

// 接收
const props = defineProps([
  'modelValue' // 接收父组件使用 v-model 传进来的值,必须用 modelValue 这个名字来接收
])

</script>
多个 v-model 绑定
父组件
// Parent.vue

<template>
  <Child v-model:msg1="message1" v-model:msg2="message2" />
</template>

<script setup>
import { ref } from 'vue'
import Child from './components/Child.vue'

const message1 = ref('雷猴')

const message2 = ref('蟑螂恶霸')
</script>
子组件
// Child.vue

<template>
  <div><button @click="changeMsg1">修改msg1</button> {{msg1}}</div>

  <div><button @click="changeMsg2">修改msg2</button> {{msg2}}</div>
</template>

<script setup>
import { ref } from 'vue'

// 接收
const props = defineProps({
  msg1: String,
  msg2: String
})

const emit = defineEmits(['update:msg1', 'update:msg2'])

function changeMsg1() {
  emit('update:msg1', '鲨鱼辣椒')
}

function changeMsg2() {
  emit('update:msg2', '蝎子莱莱')
}

</script>
v-model 修饰符
v-model 还能通过 . 的方式传入修饰。
父组件
// Parent.vue

<template>
  <Child v-model.uppercase="message" />
</template>

<script setup>
import { ref } from 'vue'
import Child from './components/Child.vue'

const message = ref('hello')
</script>
子组件
// Child.vue

<template>
  <div>{{modelValue}}</div>
</template>

<script setup>
import { ref, onMounted } from 'vue'

const props = defineProps([
  'modelValue',
  'modelModifiers'
])

const emit = defineEmits(['update:modelValue'])

onMounted(() => {
  // 判断有没有 uppercase 修饰符,有的话就执行 toUpperCase() 方法
  if (props.modelModifiers.uppercase) {
    emit('update:modelValue', props.modelValue.toUpperCase())
  }
})

</script>
插槽 slot
插槽可以理解为传一段 HTML 片段给子组件。子组件将 <slot> 元素作为承载分发内容的出口。
本文打算讲讲日常用得比较多的3种插槽:默认插槽、具名插槽、作用域插槽。
默认插槽
插槽的基础用法非常简单,只需在 子组件 中使用 <slot> 标签,就会将父组件传进来的 HTML 内容渲染出来。
父组件
// Parent.vue

<template>
  <Child>
    <div>雷猴啊</div>
  </Child>
</template>
子组件
// Child.vue

<template>
  <div>
    <slot></slot>
  </div>
</template>
具名插槽
具名插槽 就是在 默认插槽 的基础上进行分类,可以理解为对号入座。
父组件
// Parent.vue

<template>
  <Child>
    <template v-slot:monkey>
      <div>雷猴啊</div>
    </template>

    <button>鲨鱼辣椒</button>
  </Child>
</template>
子组件
// Child.vue

<template>
  <div>
    <!-- 默认插槽 -->
    <slot></slot>
    <!-- 具名插槽 -->
    <slot name="monkey"></slot>
  </div>
</template>
父组件需要使用 <template> 标签,并在标签上使用 v-solt: + 名称 。
子组件需要在 <slot> 标签里用 name= 名称 对应接收。
这就是 对号入座。
最后需要注意的是,插槽内容的排版顺序,是 以子组件里的排版为准。
作用域插槽
如果你用过 Element-Plus 这类 UI框架 的 Table ,应该就能很好的理解什么叫作用域插槽。
父组件
// Parent.vue

<template>
  <!-- v-slot="{scope}" 获取子组件传上来的数据 -->
  <!-- :list="list" 把list传给子组件 -->
  <Child v-slot="{scope}" :list="list">
    <div>
      <div>名字:{{ scope.name }}</div>
      <div>职业:{{ scope.occupation }}</div>
      <hr>
    </div>
  </Child>
</template>

<script setup>
import { ref } from 'vue'
import Child from './components/Child.vue'

const list = ref([
  { name: '雷猴', occupation: '打雷'},
  { name: '鲨鱼辣椒', occupation: '游泳'},
  { name: '蟑螂恶霸', occupation: '扫地'},
])
</script>
子组件
// Child.vue

<template>
  <div>
    <!-- 用 :scope="item" 返回每一项 -->
    <slot v-for="item in list" :scope="item" />
  </div>
</template>

<script setup>
const props = defineProps({
  list: {
    type: Array,
    default: () => []
  }
})
</script>
provide / inject
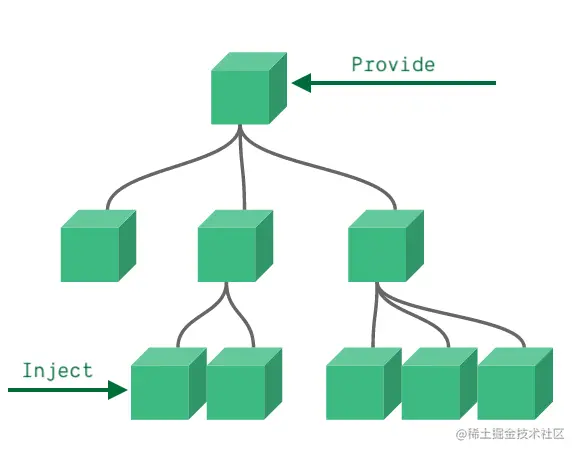
遇到多层传值时,使用 props 和 emit 的方式会显得比较笨拙。这时就可以用 provide 和 inject 了。
provide 是在父组件里使用的,可以往下传值。
inject 是在子(后代)组件里使用的,可以网上取值。
无论组件层次结构有多深,父组件都可以作为其所有子组件的依赖提供者。
父组件
// Parent.vue

<template>
  <Child></Child>
</template>

<script setup>
import { ref, provide, readonly } from 'vue'
import Child from './components/Child.vue'

const name = ref('猛虎下山')
const msg = ref('雷猴')

// 使用readonly可以让子组件无法直接修改,需要调用provide往下传的方法来修改
provide('name', readonly(name))

provide('msg', msg)

provide('changeName', (value) => {
  name.value = value
})
</script>
子组件
// Child.vue

<template>
  <div>
    <div>msg: {{ msg }}</div>
    <div>name: {{name}}</div>
    <button @click="handleClick">修改</button>
  </div>
</template>

<script setup>
import { inject } from 'vue'

const name = inject('name', 'hello') // 看看有没有值,没值的话就适用默认值(这里默认值是hello)
const msg = inject('msg')
const changeName = inject('changeName')

function handleClick() {
  // 这样写不合适,因为vue里推荐使用单向数据流,当父级使用readonly后,这行代码是不会生效的。没使用之前才会生效。
  // name.value = '雷猴'

  // 正确的方式
  changeName('虎躯一震')

  // 因为 msg 没被 readonly 过,所以可以直接修改值
  msg.value = '世界'
}
</script>
provide 可以配合 readonly 一起使用,详情可以看上面例子和注释。
provide 和 inject 其实主要是用在深层关系中传值,上面的例子只有父子2层
总线 bus
在 Vue2 有总线传值的方法,我们在 Vue3 中也可以自己模拟。
这个方式其实有点像 Vuex 或者 Pinia 那样,弄一个独立的工具出来专门控制数据。
但和 Vuex 或 Pinia 相比,我们自己写的这个方法并没有很好的数据跟踪之类的特性。
原理
我们创建一个 Bus.js 文件,用来控制数据和注册事件的。
Bus.js 里有一个 Bus 类
eventList是必须项,用来存放事件列表的。constructor里除了eventList外,其他都是自定义数据,公共数据就是存在这里的。$on方法用来注册事件。$emit方法可以调用$on里的事件。$off方法可以注销eventList里的事件。
然后需要用到总线的组件,都导入 Bus.js ,就可以共同操作一份数据了。
import { ref } from 'vue'

class Bus {
  constructor() {
    // 收集订阅信息,调度中心
	this.eventList = {}, // 事件列表,这项是必须的
    // 下面的都是自定义值
	this.msg = ref('这是一条总线的信息')
  }

  // 订阅
  $on(name, fn) {
	this.eventList[name] = this.eventList[name] || []
	this.eventList[name].push(fn)
  }

  // 发布
  $emit(name, data) {
	if (this.eventList[name]) {
      this.eventList[name].forEach((fn) => {
        fn(data)
      });
	}
  }

  // 取消订阅
  $off(name) {
      if (this.eventList[name]) {
	  delete this.eventList[name]
	}
  }
}

export default new Bus()
父组件
// Parent.vue

<template>
  <div>
    父组件:
    <span style="margin-right: 30px;">message: {{ message }}</span>
    <span>msg: {{ msg }}</span>
  </div>
  <Child></Child>
</template>

<script setup>
import { ref } from 'vue'
import Bus from './Bus.js'
import Child from './components/Child.vue'

const msg = ref(Bus.msg)

const message = ref('hello')

// 用监听的写法
Bus.$on('changeMsg', data => {
  message.value = data
})

</script>
子组件
// Child.vue

<template>
  <div>
    子组件:
    <button @click="handleBusEmit">触发Bus.$emit</button>
    <button @click="changeBusMsg">修改总线里的 msg</button>
  </div>
</template>

<script setup>
import Bus from '../Bus.js'

function handleBusEmit() {
  Bus.$emit('changeMsg', '雷猴啊')
}

function changeBusMsg() {
  // console.log(Bus.msg)
  Bus.msg.value = '在子组件里修改了总线的值'
}
</script>
Pinia
Pinia 是最近比较火热的一个工具,也是用来处理 跨组件通信 的,极大可能成为 Vuex 5 。
从我使用 Pinia 一阵后的角度来看,Pinia 跟 Vuex 相比有以下优点:
- 调用时代码更简洁了。
- 对
TS更友好。 - 合并了
Vuex的Mutation和Action。天然的支持异步了。 - 天然分包。
除此之外,Pinia 官网还说它适用于 Vue2 和 Vue3。但我没试过在 Vue2 中使用
Pinia 简化了状态管理模块,只用这3个东西就能应对日常大多任务。
state:存储数据的仓库getters:获取和过滤数据(跟computed有点像)actions:存放 “修改state”的方法
父组件
子组件